Friday, February 3, 2023

How to utilize session variables inside BI publisher reports in Oracle Fusion Cloud

So, you are trying to create a custom report in Oracle Fusion based on it's older EBS version but the EBS query contains references to session variables like USER_ID, RESP_ID.

But in Fusion, we cannot derive such session/user specific information using profile options like we used to do in EBS.

Let's see how to derive this information in Fusion BI reports.

The BI Publisher stores information about the current user that can be accessed by the report data model.

The user information is stored in system variables as described below.


Note:
BI Publisher populates all the system variables in an online report.

In case of a scheduled job, publisher doesn’t populate below system variables:

XDO_USER_REPORT_LOCALE
XDO_USER_UI_LOCALE
XDO_USER_UI_ORACLE_LANG


If we want to add the user information to a custom data model, we can define the variables as parameters and then define the parameter value as an element in the data model.

We can also add the variables as parameters then reference the parameter values in the report.


For example, if we use below query in Data Model:

select
:xdo_user_name as USER_NAME,
:xdo_user_report_oracle_lang as REPORT_LANGUAGE,
:xdo_user_report_locale as REPORT_LOCALE,
:xdo_user_ui_oracle_lang as UI_LANGUAGE,
:xdo_user_ui_locale as UI_LOCALE
from dual


It will return below output:


XML Output:

<?xml version="1.0" encoding="UTF-8"?>
<! - Generated by Publisher - >
<DATA_DS>
<G_1>
<REPORT_LANGUAGE>US</REPORT_LANGUAGE>
<REPORT_LOCALE>en_US</REPORT_LOCALE>
<UI_LANGUAGE>US</UI_LANGUAGE>
<UI_LOCALE>en_US</UI_LOCALE>
<USER_NAME>john.doe</USER_ID>
</G_1>
</DATA_DS>


Now, let's see a practical example where we can use such derivations.

Suppose below is the business requirement:

- Identify the current user name
- Find out all roles associated with this user
- Find out all the business units associated with above role(s)


Then we would write below query to achieve this:

SELECT   DISTINCT bu.bu_name
 FROM     fusion.FUN_ALL_BUSINESS_UNITS_V     bu,
                 fusion.FUN_USER_ROLE_DATA_ASGNMNTS  role,
                 fusion.per_users pu
 WHERE role.org_id = bu.bu_id
AND        pu.USER_GUID = role.USER_GUID
AND        pu.username = :xdo_user_name
AND        role.active_flag = 'Y'


The above query can be extrapolated to further utilize this business unit information to link in a bigger derivation/query based on the requirements.


This is how we can make use of session/system variables in BI publisher report in Oracle Fusion.


Share:

Tuesday, January 31, 2023

How to Customize the Seeded Reports and associated Data Models in Oracle Fusion Cloud

Let's see how to customize Data Models of any seeded report in Oracle Fusion.


- Login to Fusion environment.

- Navigate to Menu and open Tools sub-menu

- Under Tools, find and click on 'Reports and Analytics' option


- This will open the Analytics server (Transactional Business Intelligence) home page

- You will notice the URL will have /analytics in the end


- We need to change /analytics to /xmlpserver and press enter


- This will give you access to XMLP server

- Now, expand the Shared Folders directory and navigate to your desired folder in this seeded area.

e.g. Let's assume I want to customize a seeded AP report, so I will navigating to Financials -> Payables -> Invoices and locate the desired report


- Let's say we want to customize data model of PayablesInvoicesSuppliersExtract report

- Click on More and then select Customize from the context menu


- This will create a custom version of this report and you can find it under /Shared Folders/Custom path instead of seeded /Financials path

e.g. in this case, navigate to Shared Folders/Custom/Financials/Payables/Invoices to see the custom version of above report


- We can rename this to some custom name, if needed


- Now, while we are in the Custom area, let's create a folder to store data model, just like the seeded area

- Click + sign on the left and select Folder


Enter name as 'Data Models' and click Create


- This will create Data Models folder in custom path /Shared Folders/Custom/Financials/Payables/Invoices


- Now, we need to head back to the seeded area to copy the original Data Model

- Navigate to  /Shared Folders/Financials/Payables/Invoices/Data Models

- Locate the Data Model associated with our report


- Click on More and select Copy from the context menu


- Now, let's go back to the Custom area so that we can Paste this data model there

- Navigate to  /Shared Folders/Custom/Financials/Payables/Invoices and Click on Paste option in the Tasks area


- Let's rename this Data Model to some custom name

- Click More and select Rename from the context menu


- Now, let's associate this Custom Data Model with our Custom Report


- Navigate to Catalog and locate our custom report


- Click on Edit option


- Here you will see the Custom report is still pointing to Seeded Data Model


- Click on the Select Data Model button (magnifying glass)


- In the popup window, navigate to Custom area and locate the desired folder in the left pane (/Shared Folders/Custom/Financials/Payables/Invoices/Data Models in our case)

- Select the Custom Data Model from the right pane and click Open


- Now, you will see the data model name has changes to the Custom one and the navigation also points to Custom path


- Click on the Data Model link

- This will open the definition of the Data Model where we can see the underlying query and associated parameters etc.


- Here, we can modify, add or remove data sets/queries, add/modify parameters, List of Values (LOVs) as well as Bursting configurations.

- Navigate back to Catalog, locate the custom report and click on Open to run the report


This is how you can customize a seeded report and the associated data model in Oracle Fusion.


Share:

Monday, December 19, 2022

How to customize Workflow Notifications in Oracle Fusion Cloud

Wondering how to customize an existing approval workflow notification to add a new field ?
Let's see how it can be achieved in Oracle ERP Cloud.

Let’s say we want to add GL Account Description to the GL Journal Approval Workflow Notification.

Normally, most of the workflow notification are based on BI Publisher model. So let's see which one is the seeded model for GL Journal Approval.

- Navigate to BI Publisher Catalog in your environment

- In the Folders pane, expand the Shared Folders -> Financials -> Workflow Notifications -> General Ledger -> Journals folder

- Locate ' Journal Approval Report


- Click More and select Customize option


- This will automatically create a custom copy of this report under Shared Folders -> Custom -> Financials -> Workflow Notifications -> General Ledger -> Journals folder


- Now, lets modify this report to add our new customizations so that they will reflect in the email notifications.

- Open the report and click on Edit button


- This will download the template file (RTF)


- Open the template file. It should look like this -


- Modify the template and add the new column COMBINATION_DESCRIPTION under CLINE_ACCOUNT column


- This field should pertain to COMBINATION_DESCRIPTION column which is already available in the seeded data model


- Save the template and upload to the custom version of Journal Approval Report. You would need to delete the existing template and upload a new one with the same name as original 'Journal Approval Email Notification' by using the modified RTF file.

- Once you click Upload, the Journal Approval Report page will return to the thumbnail view of the report layout templates.

- You can review/verify the newly uploaded template details by clicking the View a list link. Save Report to finalize the changes.

- Once these steps are done, the new customization is in place and should automatically take effect.

NOTE -
Configurable workflow notifications are refreshed every 24 hours so that they perform better for your users. But when you're making changes to reports, sub-templates, or data models, you can apply your changes sooner so they're available for testing. Create profile options to control when notifications reflect your changes after you upload them to the BI catalog. When you're done configuring notifications, use the same profile options to turn the refresh back to every 24 hours, to optimize performance. But even if you don't, the refresh automatically resets to 24 hours when it's been more than eight hours since you set the profile options.

If you don't wish to wait for 24 hours :
You can Create Profile Options to Control the Refresh
Your profile options can apply to all workflow tasks, a product family, or a product. Based on the scope you want, your profile option must have a profile option code that follows a certain format.


- Once the customization is in place, it should reflect in the subsequent workflow notifications. We can see the account description is shown in the Journal Approval notification with this change -


Share:

Friday, November 25, 2022

How to create a Value Set in Oracle Fusion Cloud

 Let's see how to create a Value Set in Oracle Fusion/ERP Cloud.

- Go to Setup and Maintenance -


- Set the desired business area e.g. Financials -


- Search for task Manage%Value%Set% and locate it as below -


- Open the task 

- Click on + sign to create a new Value Set -


- Enter all the necessary details for Value Set definition -


- Click on Manage Values to maintain Independent Value Set values

- Click on + sign to create new values -


- Click on + sign to create new values -


Share:

Wednesday, October 5, 2022

Lexical Parameters in Seeded BIP Reports in Oracle Fusion Cloud

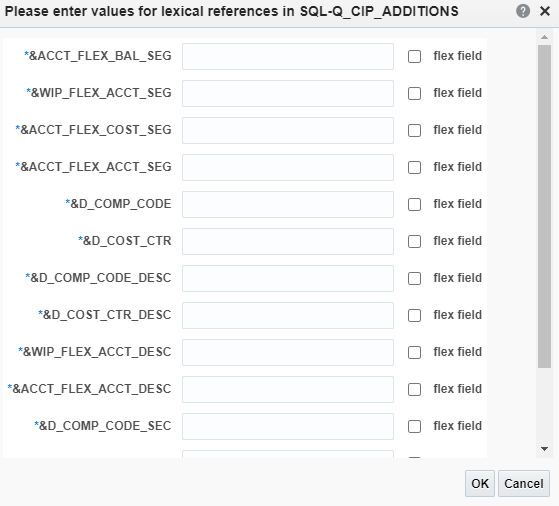
So you want to customize a seeded report, say add a new column, but when you try to edit the query, it shows a pop-up asking you to enter values for Lexical References for all lexical parameters in the seeded query.

Now as we don't know the values for these lexical references and we cannot eliminate these from seeded query otherwise the report will stop working, we are not able to proceed with our custom changes.
It usually looks something like this:


So what's the solution to this problem ?

Here's the solution -

Oracle recommends to perform the data model customization in the following manner:

- Navigate to xmlpserver and download the data model in the custom folder as xdmz file

- Unzip this file and modify _datamodel.xdm using text editor


- One opened, locate your main query and make changes directly in the query


- In case you are adding a new column, make sure to create a new XML tag for this new columns. The new column won't appear in the Data Model (in front-end) without this step.


- Zip it back and rename it back to xdmz

- Upload xdmz back to the custom folder


- Now you'll see the modified query and the new column in the data model:


Note: The changes to the data model should be done gradually and by iterating the process until the desired effect is achieved.

Using this approach, you will avoid getting the pop-ups requesting values for lexical parameter when the customization is done through the front-end in traditional way.

Share: