Friday, July 28, 2023

How to Migrate BIP and OTBI Reports to another environment in Oracle Fusion

Oracle Fusion Cloud offers a powerful suite of business intelligence and reporting tools, namely BI Publisher (BIP) and Oracle Transactional Business Intelligence (OTBI). These reporting tools enable businesses to create, customize, and analyze reports to gain valuable insights into their data.

As part of a typical implementation and/or support process, they may need to migrate these reports from one environment to another, such as from a development environment to a production environment.
So let's see what are the various methods of migrating BIP and OTBI reports seamlessly to another environment.


Prerequisites:

1. Understand the Source and Target Environments:
Before initiating the migration, make sure you have a clear understanding of the source environment (where the reports currently reside) and the target environment (where you want to migrate the reports).

2. Backup Your Reports:
It is crucial to create a backup of all your BIP and OTBI reports from the source environment. In case anything goes wrong during the migration process, you can restore the reports using the backup.

3. Export Reports from the Source Environment:
Both BIP and OTBI reports can be exported from the source environment in various formats like below:
BI Report -> .xdoz
BI Data Model -> .xdmz
OTBI Prompts -> .catalog
OTBI Analysis -> .catalog
OTBI Dashboard -> .catalog

Ensure you have exported all the necessary reports before proceeding to the migration.


Now, let's see how to perform actual migration steps:


Migrating BI Publisher (BIP) Reports:


BI Publisher reports are widely used for document-style reporting in Oracle Fusion Cloud.
To migrate these reports, follow below steps:


a. Export BIP Reports:
- Log in to the source environment and export the BIP reports you wish to migrate.

- Navigate to instance URL /xmlpserver


- Find the desired report to be exported


- Download the .xdoz file for Report and .xdmz file for Data Model


Files:


b. Access the Target Environment:
- Log in to the target environment where you want to import the BIP reports.

- Navigate to instance URL /xmlpserver

c. Upload BIP Reports:
- Navigate to the desired folder in the target environment. Locate the option to Upload the report or data model, and select the exported .xdoz, .xdmz files.


d. Review and Test:
- Once the reports are imported, review them in the target environment. Ensure that all the data sources, layouts, and parameters are correctly set up. Run some test cases to verify the accuracy of the migrated reports.


Migrating Oracle Transactional Business Intelligence (OTBI) Reports:

OTBI reports provide real-time operational intelligence by analyzing transactional data.
To migrate these reports, follow these steps:

a. Export OTBI Reports:
- Access the OTBI interface in the source environment.

- Navigate to instance URL /analytics


- Export the desired OTBI report components such as Analysis, Prompts and Dashboards using the Archive option.

Dashboard:


Prompts:


Analysis:


- Download the .catalog files.


b. Import OTBI Reports:
- Log in to the target environment and navigate to the OTBI interface.

- Navigate to instance URL /analytics

- Look for the Unarchive option to import the OTBI report components, and select the .catalog files you previously exported.


c. Validate and Optimize:
- After importing the reports, validate them to ensure all data sources, filters, and layout settings are intact. Optimize the reports if necessary, to adapt them to any changes in the target environment.


Share:

Thursday, July 20, 2023

How to customize PO Output PDF in Oracle Fusion Cloud

In Oracle ERP, Purchase Orders are crucial documents that help manage the procurement process. The ability to customize the PO Output PDF ensures that the document aligns with your organization's branding and contains relevant information specific to your business needs.
Often, we come across the need to customize seeded PO Output format to incorporate various changes/features as per business needs.
Let's see the steps to customize the PO Output PDF in Oracle Fusion Cloud.

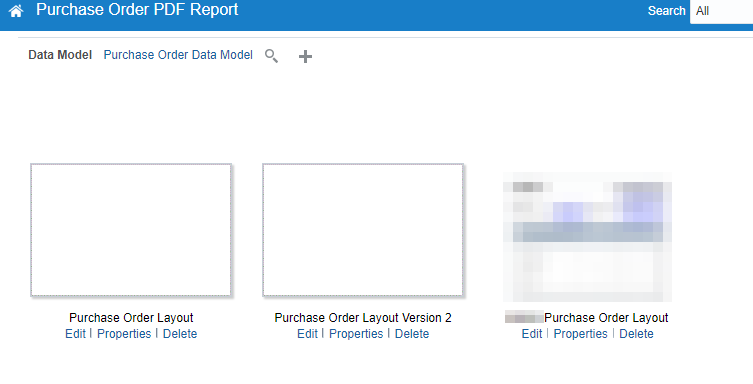
- To begin the customization process, log in to your Oracle Fusion Cloud instance with the necessary privileges to access the BI Publisher reports. Navigate to BI Publisher Reports:


- In the BI Publisher Reports section, search for the Purchase Order PDF report under this path:
/Shared Folders -> Procurement -> Purchasing


- Click More -> Customize


This will create a custom copy of this report under this path:

/Shared Folders -> Custom -> Procurement -> Purchasing

- Customize the Report Layout:
Open the newly copied report template in BI Publisher's report editor. Here, you can customize the layout, content, and formatting of the Purchase Order PDF according to your requirements.

You can download the seeded RTF template from here and include the desired data fields from the PO dataset, such as PO number, vendor information, item details, and more. You will need to run the data model for s a sample data set and download XML file so that it can be imported into template builder using PO Output RTF.
If the business requirement is to add additional columns then you will need to customize the seeded Data Model as well and you can refine the query to include additional required fields, which can be later included in the template which will be in RTF format.

- Once the custom RTF is ready, you need to upload it to the customized report as an additional template


Navigate to "View a list" option and check Default Layout box for the newly uploaded custom template


- Save the report

- Now, before you can start using this customized template, you need to complete few more steps.

- Navigate to Setup and Maintenance


- Search for 'Configure Procurement Business Function' Task


- Select Procurement BU and click OK


- Click on Document Types


- Click on Purchase Order document type


- Navigate to Document Type Details section. Under Document Layout, select your custom layout/template name from the dropdown. Click Save and Close.


- We are done with all the steps to customize and activate the custom template for PO Output PDF.
Now, let's see how we can test/use it.

- Navigate to Procurement - > Purchase Orders


- Navigate to Manage Orders and find the desired PO

- Once the PO is opened, click on View PDF. This will download the PDF file using your newly created template.


Share:

Friday, June 16, 2023

Oracle Business Network - Punchouts

Punchouts let you integrate account-based stores with your procurement system.

This integration allows a buyer who is logged into a procurement system to access a Commerce storefront, view items from the assigned catalog, add items to the cart, and return to the procurement system.

Once the procurement system approves the purchase, it sends supplier a purchase order, which becomes a sales order on their end.

Traditionally, punch-outs can be configured in the Oracle iProcurement portal but this functionality can also be achieved via Oracle Business Network (OBN).


Traditional Punchouts EBS:


Traditional Setup Challenges:

- Individual certificate management for each vendor

- Connectivity handshake/errors, errors in returning carts

- Catalog Administration maintenance


Punch-out Process through OBN:

- The buyer logs on to iProcurement. 

- Buyer clicks a link to the supplier site from iProcurement. 

- OBN authenticates the requester and sends a punchout request to the supplier.

- The supplier site responds to OBN.

- OBN forwards the supplier site response to iProcurement.

- iProcurement redirects the requester’s browser to the supplier site for shopping.

- Once buyer finishes shopping, the supplier site returns the shopping cart items to iProcurement via the requester’s browser. 

- Buyer completes the checkout process, and iProcurement processes the order.


OBN Configurations:

- Navigate to PunchOut section

- Click on Add Punchout button


- This should show a pop-up containing all the available Punchouts from various vendors who have registered on OBN


- Select the desired Punchout from the list and click Add Access. Once added, it will appear in Buyer Access section


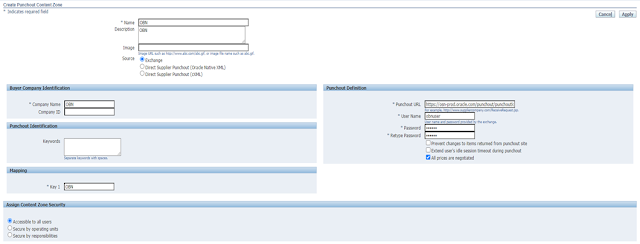
- Now, navigate to EBS and create a new Punchout Content Zone as below


Punchout URL: https://osn-prod.oracle.com/punchout/punchoutloginserver
User Name: Your OBN User
Password: Password for above user

- Save and navigate to above Content Zone entry and click below button


- This will present below page from where you need to click Download button


- This will download a file containing the Punchout definition for the configured vendors and they will be available in your catalog for use.


Oracle Business Network – Supported Transactions:

Common Transactions Types:

- Purchase Order - OAG PROCESS PO 007 and cXMLOrderRequest

- Change Purchase Order - OAG CHANGE PO 006 and cXMLOrderRequest Update

- Advance Ship Notice (ASN) - OAG SHOW SHIPMENT 005 and cXMLShipNoticeRequest

- Invoice - OAG PROCESS INVOICE 002 and cXMLInvoiceDetailRequest


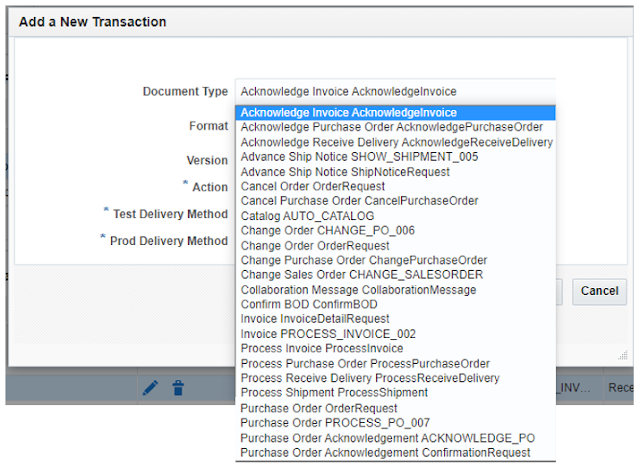
Available Document Types:


Oracle Business Network – PO Transmission Setups (EBS)

Lets look at all the EBS configurations needed for PO transmission via OBN


- Certificate Management

Navigate to osn-prod URL and download the certificate as shown below:


- Download and Import above certificate into $INST_TOP/certs/Apache/cwallet.sso


- EBS XML Gateway Hub Definition:


- Trading Partner Setup:

Configure new a new entry for a given supplier using Map 'itg_process_po_007_out' as shown below.


Oracle Business Network – AP Invoice Import Setups (EBS)

- Trading Partner Setup:

Configure new a new entry for a given supplier using Map 'AP_INVOICE_INBOUND' as shown below.


With all above steps completed, you would have Supplier Punchouts, PO Transmission Outbound and AP Invoice Inbound processes configured using Oracle Business Network.

Share:

Wednesday, April 12, 2023

Oracle Business Network - Deep Dive

In my previous post, I shed light on basics of Oracle Business Network and it's capabilities.

Let's take a deep dive into OBN configurations as well as corresponding EBS setups and it's uses.


OBN Home Page

Once you login to OBN, here's what you see on Home Page. You'll see various tabs such as Profile, Messaging, Partners, Monitor etc.


Company Profile

Profile page let's you maintain your company's profile details. This is mainly for information purpose only.


Messaging Setup

This is one of the crucial setup pages. We can define various Communication Parameters as well as Transaction configurations here.

In below example, we are configuring two transactions:

1. Send POs from EBS to Trading Partner
2. Receives Invoices from Trading Partner to EBS


Now, let's take a look at Delivery Method configuration

We have defined two Delivery Methods:

1. Oracle XML Transport Agent - Used to specify EBS server details. This is how OBN connects to our EBS instance.
2. HTTPS URL Connection - Used to specify OBN server details. This is to make connection to our OBN account through which the messages/documents are exchanged with Trading partners.

Oracle XML Transport Agent:
As shown below, we need to specify Transport Agent URL here, one pertaining to Test Environment and another pertaining to Production Environment; along with the EBS user credentials.
Usually, the best practice is to create a dedicated user in EBS for such purposes so that we can track all incoming and outgoing transactions to and from OBN.


HTTPS URL Connection:

As shown below, we need to specify OBN specific URLs here, one pertaining to Test Environment and another pertaining to Production Environment; along with our OBN user credentials.

The URLs are usually fixed for Test and Production Hubs:
OBN Test Hub HTTPS URL: https://osn.oracle.com:443/HTTPService/Receiver OR https://osn.oracle.com/HTTPService/Receiver
OBN Production Hub HTTPS URL: https://osn-prod.oracle.com:443/HTTPService/Receiver OR https://osn-prod.oracle.com/HTTPService/Receiver


Let's take a look at Transaction Management configuration

For Invoice transaction, we use below parameters:

Document Format: OAG
Format Version: 002
Document Type: PROCESS_INVOICE_002
Action: Receive

And, we choose Oracle XML Transport Agent for both Test and Prod instances:


For, Purchase Order transaction, we use below parameters:

Document Format: OAG
Format Version: 007
Document Type: PROCESS_PO_007
Action: Send

And, we choose Oracle XML Transport Agent for both Test and Prod instances:


We can test our configuration by sending a dummy/test document by accessing Send Document tab as shown below.
Here, we can use Test Hub and Document Type from above steps (PROCESS_PO_007) and upload the test payload/file to test out configuration.


Trading Partner Setup

Now, let's take a look at how we can add new Trading Partners and maintain the current ones.

Under Partners tab, we can see Add Trading Partners option. This lets you Search the desired Trading partner from the list and add them to our OBN account.
Note:
The trading partner must have registered on OBN for you to search and add them; or else you won't see them in the list of registered OBN partners.


Under Pending Approval tab, we will be able to see all the trading partners we added to our account but are still pending approval from their end.

Once we add a trading partner in our OBN account, the corresponding partner admin gets a notification asking to approve this request. Only once they approve your request, they will appear as Approved under your trading partners list.


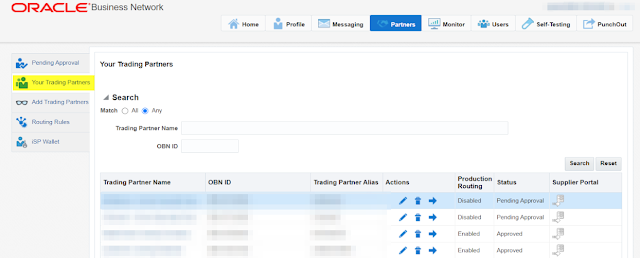
All the Trading Partners that you added in your OBN account will appear under Your Trading Partners tab. This includes the ones that are Approved as well as the ones that are Pending Approval.


Monitoring the inbound and Outbound Transactions

Navigate to Monitor tab and we'll see two options: Sent Messages and Received Messages

Sent Messages:
If we click on download button against any Sent Message, it will let us download Pre-Transform or Post-Transform document. I've explained about these in my previous post.


If we wish to Resend any message, then we can click on Resend button and click OK. This will Resend that particular message to Trading Partner.
This is useful especially when there's a transmission failure which may happen for a number of reasons one of which could be that Trading partner server was down or was under maintenance and now you need to resend all pending/failed messages; this feature comes handy in such cases.
You can also use Resend All option to Resend all the desired messages to Trading Partner.


Received Messages:

Similarly, we can monitor all Incoming messages under Received Messaged tab. Here also, we have similar options either to download the Pre and Post transform documents and also to Resend the message to EBS server.


Supported Transaction Types

Below are some of the Common Transactions Types supported by OBN:

Purchase Order - OAG PROCESS PO 007 and cXMLOrderRequest

Change Purchase Order - OAG CHANGE PO 006 and cXMLOrderRequest Update

Advance Ship Notice (ASN) - OAG SHOW SHIPMENT 005 and cXMLShipNoticeRequest

Invoice - OAG PROCESS INVOICE 002 and cXMLInvoiceDetailRequest

Available Document Types:


EBS Configurations for OBN

Now, let's see what all configurations we need to do in EBS in order to connect to OBN and exchange the messages.


Certificate Management

Navigate to OBN Test or Prod URLs and download the certificate for the same.


Import the certificate into $INST_TOP/certs/Apache/cwallet.sso


Hub Definition in EBS

We need to define a new Hub in EBS using either Test or Prod URL of OBN as shown below:


PO Transmission (Outbound) Setup

Navigate to Trading Partner Setup and create a new entry using itg_process_po_007_out Map as shown below:


AP Invoice (Inbound) Setup

Navigate to Trading Partner Setup and create a new entry using AP_INVOICE_INBOUND Map as shown below:


Voila !
We have finished all the setups in OBN as well as EBS. With this in place, all the Outbound POs and Inbound Invoices for this Trading Partner will be exchanged via Oracle Business Network.

Share: